In everyday life and in your career, it helps to approach large projects in small steps. This is also how microlearning works: Small learning bites create real learning transfer! Check out examples of microlearning now – as an alternative to complex instructions in daily life and as online support for training.
Update September 2020
The Ultimate Microlearning Guide for Online Courses
Start now with your own microlearning course! In our new guide, you will learn step by step how to build your own microlearning. With many tips and examples.
The Idea Behind Microlearning: Short Learning Bites
Microlearning, bite-sized learning, or Bite-sized Learning – all these technical terms aim at one idea: Simplifying the learning process by breaking it down into small bites. This works in corporate training just as well as in everyday life, for example when you want to operate a device for the first time.
Update August 2022: Are you interested in the topic of learning bites? Then read the article about Learning Nuggets (Definition + Examples) on our blog! 💡

The Idea of Microlearning: Breaking learning content into small bites, making them easier to process.
If you want to offer content in the form of microlearning, ideally, you start directly with small bites. How that works, I described some time ago here: Microlearning – 3 Rules for Creating Learning Bites.
Today, I present to you concrete examples of microlearning. Here’s how short learning content can look in everyday life and at work:
In everyday life: As an alternative to unwanted instructions
In the workplace: As an online course for corporate training
1. Example: Microlearning in Instructions
When did you last read an instruction manual? I mean – really read it? It’s probably been quite a while – at least according to a study that examined our behavior toward operating instructions. "Life is too short to RTFM" is the title of the study: Life is too short to read manuals.
The findings of the scientific study may not surprise us, but they do provide us with nice statistics on the topic of learning:
People only read approximately 25% of instructions for devices in everyday life.
The more educated a person is, the less they tend to read instructions.
The younger the person, the less they read instructions.
The reason: Instructions are often too complex and we associate them with negative emotions: Takes too long – Doesn’t help anyway – Doing it myself is faster! The trend is towards “learning by doing” – especially among educated and young people.
To not leave customers completely alone, more and more companies are relying on the concept of microlearning. Often, along with a detailed manual for referencing a specific problem, there is also a very brief, usually illustrated quick-start guide for the first steps.
Microlearning in everyday life works best as a quick-start guide: As few steps as possible, presented as simply as possible!
Microlearning Example: Instructions for the Rocket Pack – Card Game for Blended Learning
The rocket pack is a card game for trainers looking for ideas for their blended learning. In addition to a manual booklet with detailed descriptions, a card is also included, allowing the user to start right away – entirely based on the principle of microlearning:
Three small steps
Little text, simply phrased
Clearly illustrated
Very action-oriented
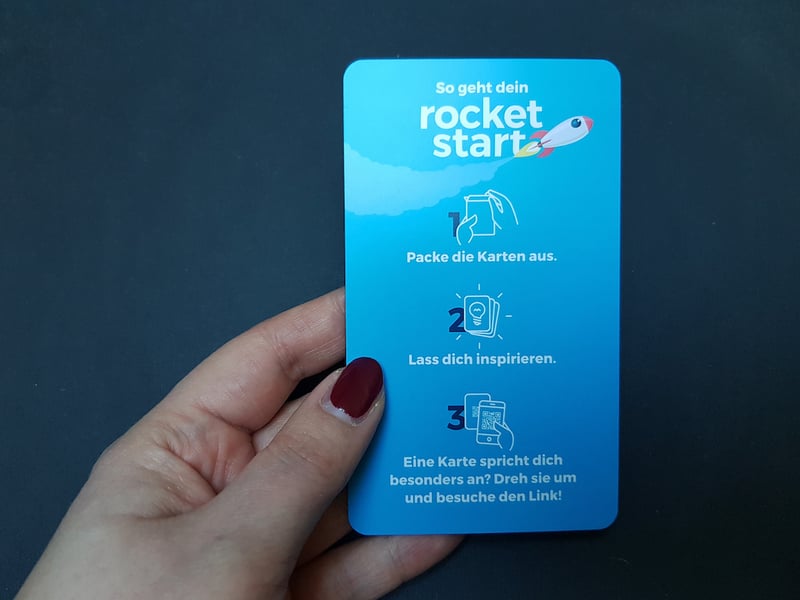
Starting right away is more fun than reading the instructions first. More about the rocket pack at blink.it/rocketpack!
2. Example: Microlearning in Training
Our behavior with instructions shows how important learning in small bites is in all forms of education. However, the content is not always as easy to understand as it is in the rocket pack card game. For long-term behavioral changes in corporate training, a trainee often has to process many complex pieces of information.
Trainers often find it difficult to condense their knowledge amassed over years into two minutes. And don’t worry: Microlearning is not about cutting so much that only an empty shell remains! On the contrary: Content for microlearning is not only short but also very action-oriented.
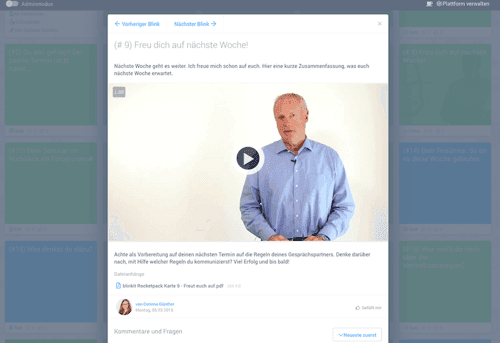
Just like in this example from trainer Wolfgang Schneiderheinze, who addresses the topic of "filler words" in his online support in the form of microlearning: In just over a minute, a problem, a solution, and an exercise task for the participants are compactly packaged – very short, yet full of content:
This is what Microlearning Looks Like as Online Support
The aforementioned video is part of a complete online course as micro-content. The idea: To offer many short learning impulses following a traditional classroom training.
This way, training participants can gradually process small contents – ideally spread over several weeks to enhance learning transfer.
Incorporated into a complete online course, microlearning can look like this:
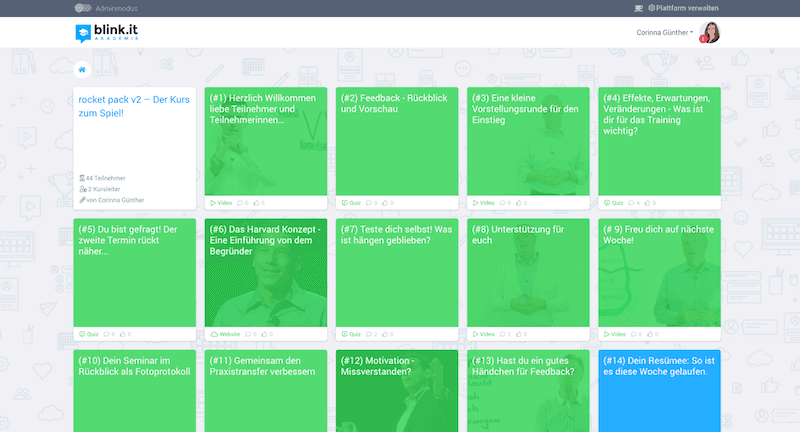
Example Microlearning with the learning platform blink.it: Green micro-contents have already been viewed by the user; blue ones are unlocked but still unseen.
This is How Microlearning Works in the Online Course for the Participant
Basically, each tile (“Blink”) is a micro-content, meaning a small learning unit. This can be a video, a small text, or even a quiz. Important: Each blink in microlearning is linked to a specific call to action and is truly quick to process.
The participants start with the first blink and gradually work their way through the entire course – always with their own time management, embedded in their daily lives.
You can see how you can use these methods in the following examples of microlearning. Here’s what the methods “Get excited about”,” “The virtual discussion,” and “Tease the detective in you” look like when implemented in an online course:
1. Microlearning Example “Get Excited About…” (Category: Support)

2. Microlearning Example “The Virtual Discussion” (Category: Reflect)


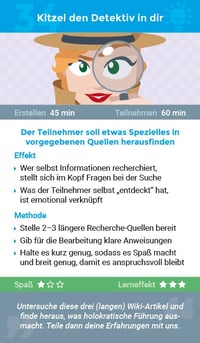
3. Microlearning Example “Tease the Detective in You” (Category: Understand)

The outcome for all examples: Short learning bites with compact content that are perfectly suited for microlearning!
Conclusion
💡 Microlearning achieves its greatest impact when learning content is consistently divided into action-oriented, clearly defined units that can be flexibly integrated into daily life and work.
Whether in the form of a quick-start guide or as accompanying online units in the context of training: Small learning bites lower the entrance barrier, increase motivation, and support sustainable learning transfer. What is crucial is not just the brevity of the content but its clear structure and immediate applicability.
When used correctly, microlearning becomes an effective tool to make complex topics tangible and to anchor learning permanently in everyday work.
Updated on 25.02.2026